Contributed recipes collection
This page presents lists of use cases. If you’re looking for straight, practical information, you are at the right place. If you prefer a thorough presentation of the software and database structure, check the section software for botanical gardens
All material here has been contributed by gardens using the software and sharing their experiences back to the user community.
The authors of the software wish to thank all dearly.
Quito Botanical Garden
At the JBQ, Quito Botanical Garden, we have adopted the Ghini software in April 2015. Since that time, we have accumulated experience with the program, and we are ourselves in need to document it, in order to secure the knowledge to the institution. We are happy to share it.
Technical
We work on GNU/Linux, a platform that many users don’t master, and our database is inside of a remote database management system. This implies steps that are not obvious to the casual end user.
How to start a program
To start a program given its name, hit the
 key next to Alt, or
click on
key next to Alt, or
click on  , then start typing
the name of the program, in our case “Ghini” or just click on the program
symbol
, then start typing
the name of the program, in our case “Ghini” or just click on the program
symbol  , appearing near the
left margin of your display.
, appearing near the
left margin of your display.Database server
We chose for a centralised PostgreSQL database server. This way we are protected from concurrent conflicting changes, and all changes are simultaneously available on all ghini clients. We did need to outsource database server management.
adding a new user
Ghini keeps track of the user performing all sort of edits to the database, and at the garden, apart from the stable users, we have all sorts of temporary users writing to the database, that we decided we would let Ghini help us keep track of database events.
Since we work using PostgreSQL, the users that Ghini stores in the database history are the database users, not the system users.
Each user knows their own password, and only knows that one. Our super-user, responsible for the database content, also has the
baublefictional user password, which we only only use to create other users.We do not use account names like
voluntario, because such accounts do not help us associate the name to the person.— adding a new system user (linux/osx)
Adding a system user is not strictly necessary, as ghini does not use it in the logs, however, adding a system user allows for separation of preferences, configured connections, search history. On some of our systems we have a single shared account with several configured connections, on other systems we have one account per user.
On systems with one account per user, our users have a single configured connection, and we hold the database password in the
/home/<account>/.pgpassfile. This file is only readable for the<account>owner.On systems with a shared account, the user must select their own connection and type the corresponding password.
These are the steps to add system users:
sudo -k; sudo adduser test
sudo adduser test adm; sudo adduser test sudo
sudo adduser test sambashare; sudo adduser test ghini
— adding a new database user
Ghini has a very minimal interface to user management, it only works with postgresql and it very much lacks maintainance. We have opened issues that will allow us use it, for the time being we use the
create-role.shscript:#!/bin/bash USER=$1 PASSWD=$2 shift 2 cat <<EOF | psql bauble -U bauble $@ create role $USER with login password '$PASSWD'; alter role $USER with login password '$PASSWD'; grant all privileges on all tables in schema public to $USER; grant all privileges on all sequences in schema public to $USER; grant all privileges on all functions in schema public to $USER; EOF
The redundant
alter rolefollowing thecreate rolelets us apply the same script also for correcting existing accounts.Our ghini database is called
bauble, andbaubleis also the name of our database super user, the only user withCREATEROLEprivilege.For example, the following invocation would create the user
willemwith passwordorange, on thebaubledatabase hosted at 192.168.5.6:./create-role.sh willem orange -h 192.168.5.6
Understanding when to update
Updating the system
Ubuntu updates are a lot lighter and easier than with Windows. So whenever the system suggests an update, we let it do that. Generally, there’s no need to wait during the update nor to reboot after it’s done.
Updating ghini
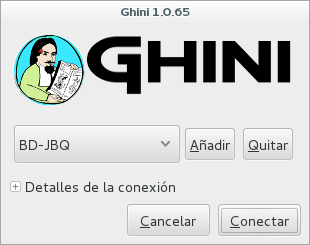
The first window presented by Ghini looks like this. Normally, you don’t need do anything in this window, just press enter and get into the main program screen.
Occasionally, at the top of the screen an information text will appear, telling you that a newer version is available on-line.

The update procedure is simple, and it depends on the operating system you use, we’re not explaining here again.
It is generally a good idea updating the software. If in doubt, contact the author, or write to the group.
understanding ghini initial screen
Complete screen
At the moment of writing, our initial screen looked like this:
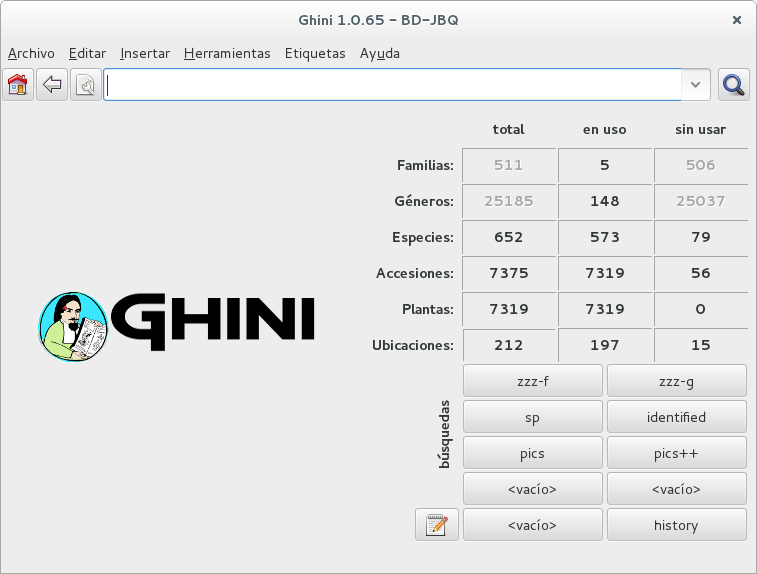
Apart from the main application menu, Ghini offers three special interface sections with information and tools to explore the database.
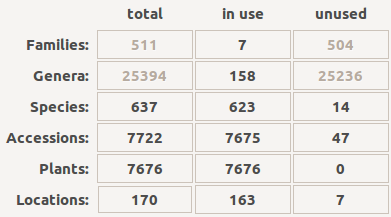
Numeric overview
The table in the right half of the screen presents a summary of all the registered plants can be observed. Each entry printed in bold is a link to the query selecting the corresponding objects.
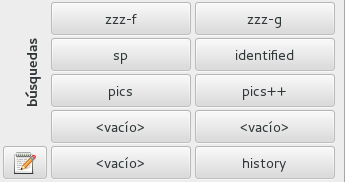
Stored queries
The lower half of the right hand side contains a set of stored queries. While you can edit them to your liking, our hints include selecting those accessions that have not been identified at rank species. And one for the database history.
Query and action buttons
At the top of this screen you can find the field in which you would enter your searches.

- With the
 button,
in the form of a house, you can return from your searches to the
main screen.
button,
in the form of a house, you can return from your searches to the
main screen. - With the
 button,
in the form of an arrow, you can return to your last search.
button,
in the form of an arrow, you can return to your last search. - With the
 button,
in the form of a gear, you can start the “Query Builder”, which
helps you compose complex searches in a simple, graphical way.
button,
in the form of a gear, you can start the “Query Builder”, which
helps you compose complex searches in a simple, graphical way.
- With the
We often have volunteers who only work at the garden for a very short time. It was with them in mind that we have developed a hyper-simplified view on the ghini database structure.
Details
The two figures here show all that our temporary collaborators need to know.
Taxonomy & Collection Garden 
At times, the program gives error messages.
 , retry, or
report to the developers.
, retry, or
report to the developers.Network problems
In order to work, the program needs a stable network connection to the database server. It can happen: you start the program, and it can’t connect to our database server. You would then get a rather explicit but very badly typeset error message.

Just ignore it and try again.
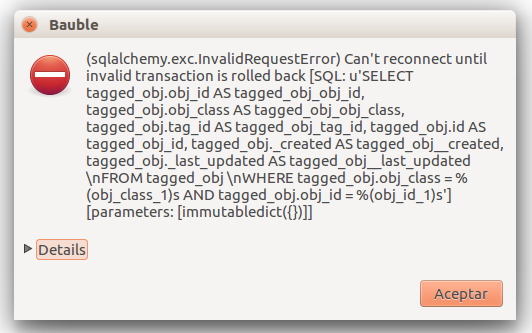
Search fails with error
Sometimes and without any apparent cause, a search will not run successfully, and a window with an error message will be displayed. In this case you only have to try to perform the same search again.
An example of such an error message:
Search does not return something I just inserted
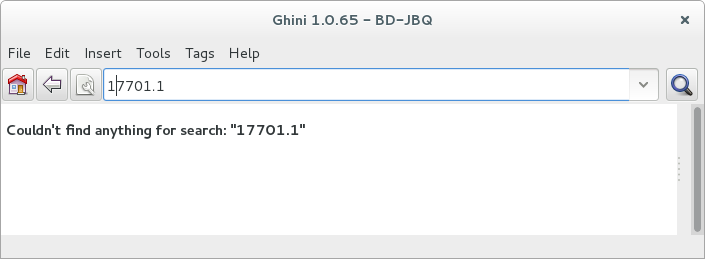
Accession codes starting with zero and composed of just numbers, as for example
016489are considered by the software as numbers, so if you don’t enclose the search string in quotes, any leading 0 will be stripped and the value will not be found.Try again, but enclose your search string in single or double quotes.
Number on the label corresponding search 16489 ‘016489’ Please note: when you look for a Plant code, not an Accession, the leading zero becomes optional, so in the above example it’s maybe easier to type
16489.1.A serious situation happened once, and we absolutely want to prevent it from happening again: a user deleted a genus, with everything that was below it, species and accessions, and synonyms.
Solving it with user permissions
We propose to have different connection profiles, associated to different database users, each user with all needed permissions.
- Full permission (BD-JBQ)
Only qualified personnel get this kind of access.
- Insert and update (BD-JBQ-limitado)
We use this one for those users who come help us for a limited time, and who did not get a complete introduction to database concepts. It is meant to prevent costly mistakes.
- Read only (BD-JBQ-lectura)
it can be shared with anyone visiting the garden
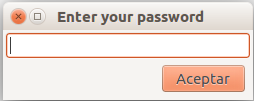
You select the connection at start-up, and the software asks you for the password corresponding to the connection you selected.
If you want to review the details of the connection, click on the ▶ next to ‘Connection Details’, it will change to ▼, and the connection window will be displayed as one of the following:
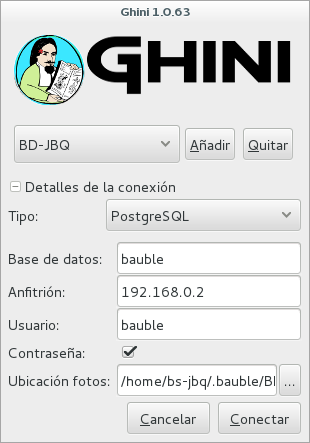
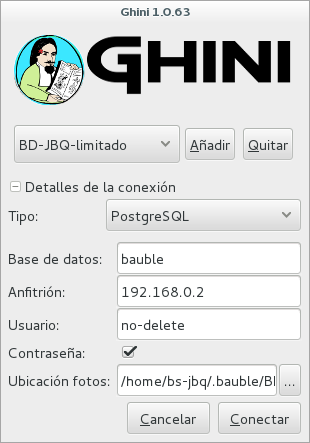

As you can see, we are connecting to the same database server, each connection uses the same database on the server, but with different user.
Thinking further about it
On the other hand, we are questioning if it is at all appropriate, letting any user delete something at such high level as a family, or a genus, or, for that matters, of anything connected to accessions in the collection.
The ghini way to question the software features, is by opening a corresponding issue.
When contacting the developers, they will definitely ask for technical information, or at least to see a screen-shot. Help them help you.
Taking a screen-shot
On Linux there are three ways to create a screen-shot, all involve hitting the ‘PrtSc’ key. The most practical one is possibly hitting the ‘PrtSc’ key in combination with Ctrl and Shift. This will start an interactive screen copy tool. You select a rectangle and the area is copied in the clipboard. Paste it in the email you’re writing, or in the chat line where the developers are trying to help you.
Where are the logs
Ghini continuously saves a very informative log file, in the
~/.bauble/bauble.logfile. Don’t bother opening it, just send it over. It contains loads of technical information.Continuous unmanned alerting
An other option is to activate the sentry handler. It will notify our sentry server of any serious situations in the software. If you registered, the developers will know how to contact you if necessary.
To the healthy paranoid: we’re not monitoring what you’re doing, we’re monitoring how our software works. You can always opt out.
You activate the Sentry handler in the
:prefspage: look for the row with namebauble.use_sentry_handler, if the value is not what you wish, double click on the line and it will change to the other value.
Taxonomy
Introduction
Orchidaceae taxonomic complexity
At the JBQ, we work most of all with orchids, family Orchidaceae, one of the largest plant families, with no less than 850 genera, organized —according to Dressler— in approximately 70 subtribes, 22 tribes, 5 subfamilies. How we represent this information is not obvious and needs be explained.
The taxonomy of the Orchidaceae family is continuously being reviewed. Genera get added, refused, reorganized, recognized as synonyms, some taxonomists prefer grouping species or genera in a new way, others split them again and differently, botanists of different nationalities may have different views on the matter. All this sounds very complex and specialistic, but it’s part of our daily routine, and it can all be stored in our Ghini database.
Identifying at rank Genus, or Family
At rank genus
Ghini-1.0 prescribes that an accession is identified at rank species, in all cases. The current maintainer acknowledges that this is a mistake, coming from the early Bauble days, and which Ghini-1.0 has in common with other botanic software. Until this is fixed, we rely on established practices.
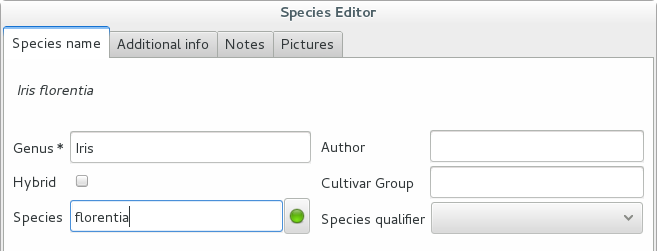
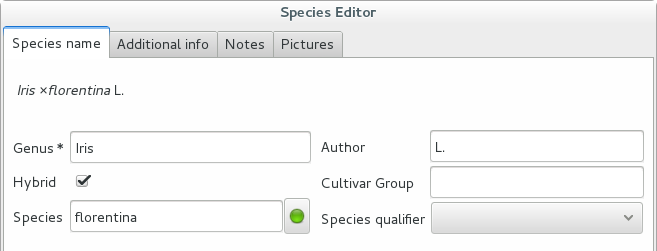
If an accession is identified at rank genus, we add a fictive species in that genus, we don’t specify its species epithet (we don’t know that) and we add an unranked epithet in the infraspecific information section, like this:
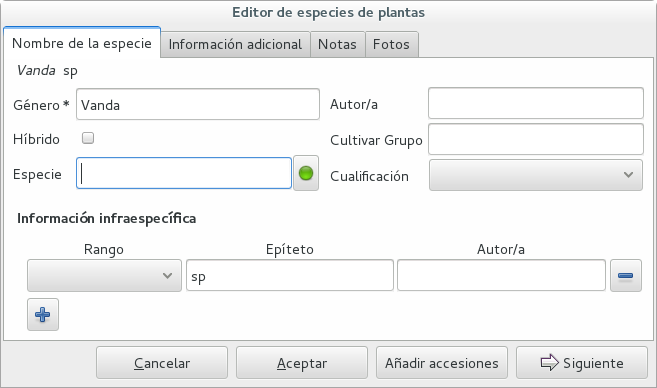
When displayed in a search result, it shows like this:

At rank family
If an accession is only identified at rank family, we need a fictive genus, to which we can add the fictive species. Since our garden is primarily focusing on Orchidaceae, we use the very short name Zzz for the fictive genus within the family, like this:

The current maintainer suggests to use the prefix Zzz- and behind the prefix to write the family name, possibly removing the trailing e. Removal of the trailing e is useful in order not to get results that include genus names when you as for stuff ending in aceae.
Apart from the aforementioned Zzz genus in the Orchidaceae family, we follow this suggested practice, so for example our collection would include Zzz-cactacea or Zzz-bromeliacea.
Remember: our Zzz genus is a fictive genus in the Orchidaceae family, do not use it as unspecified genus in other families.
Identifying at a rank that is not allowed by the software (eg: Subtribe, or Subfamily)
At rank subtribe
We sometimes can’t identify a taxon at rank genus, but we do manage to be more precise than just “it’s an orchid”. Quite often we are able to indicate the subtribe, this is useful when you want to produce hybrids.
The software does not let us store ranks which are intermediate between family and genus, so we need to invent something, and this is what we do:
We insert a fictive genus, naming it as the subtribe, prefixing it with ‘Zzx-’, like in this example:

This Zzx-Laeliinae is some genus in the Laeliinae subtribe.
In order to be able to select genera by subtribe, we also add a note to the Zzx-Laeliinae fictive genus as well as for all real genera in that subtribe, note category subtribus, note value the subtribe name.
This allows for queries like:
genus where notes.note=LaeliinaeWe are very much looking forward to seeing that issue-9 solved!
At rank subfamily, tribe
Just as we reserved the prefix Zzx- for subtribe, we reserve the prefixes Zzy- for tribe, Zzw- for subfamily.
In particular, the subfamily information is relevant, because there are subfamilies within the Orchidaceae family which are not further separated.
Editing the Accession identification - the Species details
Placeholder species for individual accessions
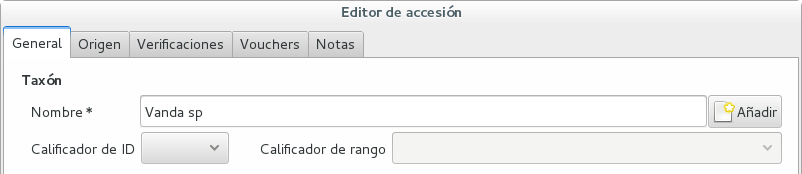
Scenario one describes the identification of a single accession, which had been associated to a “generic”, placeholder species, something like “Zzz sp” or “Vanda sp”;
In this case, when the plant species becomes known, we change the association in the accession, selecting a different species.
We do not edit the species, because there might be totally unrelated accessions connected to the same placeholder species.
Unknown species for multiple accessions
A different case is when we have a whole batch of accessions, all obviously the same species, but we haven’t been able to identify it. In this case, we associate the accessions with an incompletely specified species, something like “Zzz sp-59”, preferably adding the taxonomist’s name, who made the association.
A species like “Vanda sp-018599” is not a placeholder species, it is a very concrete species, which we haven’t yet identified.
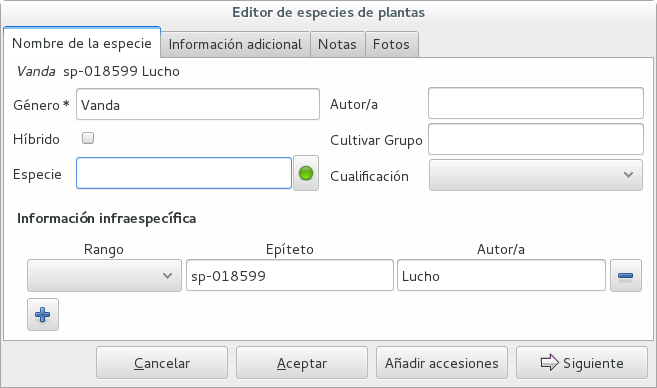
In this case, when the species gets identified (and it could even be a species nova), we directly edit the species, so all accessions that refer to it get the change.
A new plants is relative to a species not yet in our collection.
Last minute species
We start this from the Accession window and it’s very simple, just click on the + next to the species name, we get into the Species window.
Adding a species and using online taxonomic services
Adding a new species — the plant list.
We start the obvious way: type the genus epithet, possibly select it from the completion list, then type the species epithet, or at least your best guess.
Next to the species epithet field there’s a small button,
 , which connects us to the plant list. Click on it, a
message area appears at the top of the window.
, which connects us to the plant list. Click on it, a
message area appears at the top of the window.
Depending on the speed of your internet connection, but also on how close your best guess is to a correct published name, the top area will change to something like this:

Accept the hint and it will be as if you had typed the data yourself.
Reviewing a whole selection — TNRS.
This is described in the manual, it’s extremely useful, don’t forget about it.
Let the database fit the garden
A never-ending task is reviewing what we have in the garden and have it match what we have in the database.
Initial status and variable resources
When we adopted ghini, we imported into it all that was properly described in a filemaker database. That database focused solely on Orchids and even so it was far from complete. In practice, we still meet labeled plants in the garden which have never been inserted in the database.
From time to time, we manage to get resources to review the garden, comparing it to the collection in the database, and the main activity is to insert accession codes to the database, take pictures of the plant in question, and note its location, all tasks that are described in the remainder of this section.
The small Android app ghini.pocket was added to the Ghini family while a Ghini programmer was here in Quito. It helps us take a snapshot of the database in our pocket while walking in the garden, but it also allows for a very swift inventory procedure.
Inventory procedure
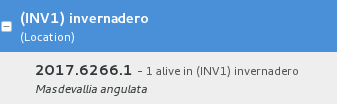
We start ghini.pocket, we write down the name of the location where we will be conducting the inventory, for example (INV 1) for greenhouse 1. We enter (type or scan if the plant has bar code or QR code) the accession code and we look it up in ghini.pocket.
A side effect of performing the search is that ghini.pocket writes the date with time, location and the code looked for in a text file that can later be imported into the database.
For a greenhouse with around 1000 plants our estimates suggest you will need two days, working at relaxed pace, from 8:00 am to 5:00 pm.
After having imported the file generated by ghini.pocket, it is easy to reveal which plants are missing. For example: If we did the inventory of the INV3 from 4 to 5 September, this is the corresponding search:
plant where location.code = 'INV3' and not notes.note like '2017090%'
All of these plants can be marked as dead, or lost, according to garden policy.
Visualizing the need of taxonomic attention
Our protocol includes one more detail intended to visually highlight plants that need the attention of a taxonomist.

A plant that only appears in our data base identified at family level or that wasn’t yet the database receives a visual signal (e.g.: a wooden or plastic stick, for ice cream or french fries), to highlight that it is not identified. In this way the taxonomist in charge, when making a tour of the greenhouse can quickly spot them and possibly proceed to add their identification in the database.
Naming convention in garden locations
Details
code description CAC-B x Reserved to cactus plants next to the orchids exposition glasshouses. CRV: Nepenthaceae exibition IC-xx: orquidearios de calor en el jardín (1A a 9C son lugares especificos entre del orquideario) IF-xx: orquidearios de frío en el jardín (1A a 5I son lugares específicos dentro del orquideario) INV1: invernadero 1 (calor) INV2: invernadero 2 (frío) INV3: invernadero 3 (calor) Adding an Accession for a Plant
Obviously we keep increasing our collection, with plants coming from commercial sources, or collected from the wild, more rarely coming from expeditions to remote areas of our country, or we receive plants which were illegally collected.
Sometimes we have to add plants to the digital collection, just because we have them physically, found in the garden, with or without its label, but without their digital counterpart.
Existing plant, found in the garden with its own label
This activity starts with a plant, which was found at a specific garden location, an accession label, and the knowledge that the accession code is not in the database.


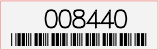

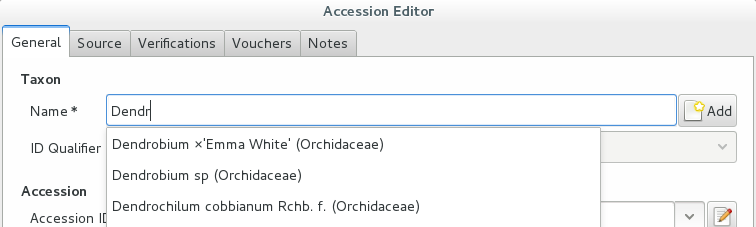
For this example, let’s assume we are going to insert this information in the database.
Accession Species Location 008440 Dendrobium ×’Emma White’ Invernadero 1 (calor) We go straight into the Accession Editor, start typing the species name in the corresponding field. Luckily, the species was already in the database, otherwise we would use the Add button next to the entry field.
We select the correct species, and we fill in a couple more fields, leaving the rest to the default values:
Accession ID Type of Material Quantity Provenance 008440 Plant 1 Unknown After this, we continue to the Plant editor, by clicking on Add Plants.
We do not fill in the Accession’s “Intended Locations”, because we don’t know what was the original intention when the plant was first acquired.
In the Plant Editor, we insert the Quantity and the Location. And we’re done.
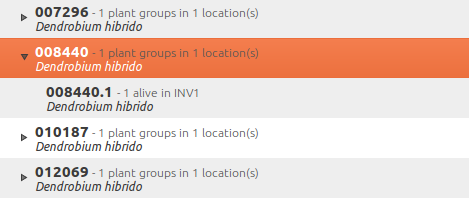
The plant is now part of the database:
New accession: plant just entering the garden
This activity starts with a new Plant, just acquired from a known Source, a plant label, and an intended Location in the garden.
We mostly do the same as for the case that a plant is found in the garden, there are two differences: (1) we know the source of the plant; (2) acquiring this plant was a planned action, and we intend to place it at a specific location in the garden.
Again, we go straight into the Accession Editor, start typing the species and we either select if from the completion list or we add it on the fly.
Accession ID Type of Material Quantity Source 033724 Plant 1 specified After this, we continue to the Plant editor, by clicking on Add Plants.
In the Plant Editor, we insert the Quantity and the Location.
Please note that the plant may be initially placed in a greenhouse, before it reaches its intended location in the garden.
Existing plant, found in the garden without its label
When this happens, we can’t be sure the plant had never been in the collection, so we act as if we were re-labeling the plant. This is discussed in the next section, but we fall back to the case of a new accession.
When we physically associate a label to a plant, there’s always the chance that something happens either to the plant (it may die) or to the label (it may become unreadable), or to the association (they may be separated). We have software-aided protocols for these events.
We find a dead plant
Whenever a plant is found dead, we collect its label and put it in a box next to the main data insertion terminal, the box is marked “dead plants”.
Definitely at least once a week, the box is emptied and the database is updated with this information.
Dead plants aren’t removed from the database, they stay there but get a quantity zero. If the cause of death is known, this is also written in the database.
Please once again remember that a Plant is not an Accession and please remember we do not remove objects from the database, we just add to their history.
Insert the complete plant code (something like
012345.1, or2017.0001.3, and you don’t need leading zeros nor quotes), right click on the corresponding row, and click on edit. change the quantity to 0, fill in the reason and preferably also the date of change.If you need add any details about the plant death, please use a note, and re-use the note category “death_cause”.
Plants with quantity zero are shown with a different colour in the results view. This helps distinguish them from live plants.
We find a plant without a label
We can’t be sure the plant had ever been in the collection or not. We assume it had, and that its label was lost.
Losing a plant label is unfortunate, but it just sometimes happens. What we do is to put a new label to the plant, and to clearly state that the label is a replacement of an original one.
We then handle the case as if it was a new accession, plus we add a note to the accession, category “label”, text “relabeled”.
Keeping track of different sources of plant material
What different sources we can have
In this botanical garden, we receive plants from different types of origin. It could be from expeditions (plants coming from nature, collected with legal permission from MAE - Ecuadorian Environment Ministry), donated plants mostly coming as gifts from collectors or orchid commercialization enterprises, purchased, or confiscated plants (usually coming from MAE raids around the country).
If the plant comes from a wild source
The accession editor offers the option “origin” option. When a plant is traceable to a wild source, we can specified its specific origin. We want to comply with ITF2, and ghini-1.0 only partly respects that standard. The ITF2 complying options are:
- Wild: Accession of wild source.
- Cultivated: Propagule(s) from a wild source plant.
- Not Wild: Accession not traceable to a wild source.
- Insufficient data
In the case of a donated plant, it is better to put detail information just as a note in the plant accession; in the case of a plant with an unknown origin, we select the Insufficient data option.
Using the source tab in the accession editor
In this section we can create or use a contact, our source of plant material. It could be from an expedition to a collecting place, and in this case we would specify the region and the expedition name, or could be the name of the person or enterprise donating a specific batch of plants.
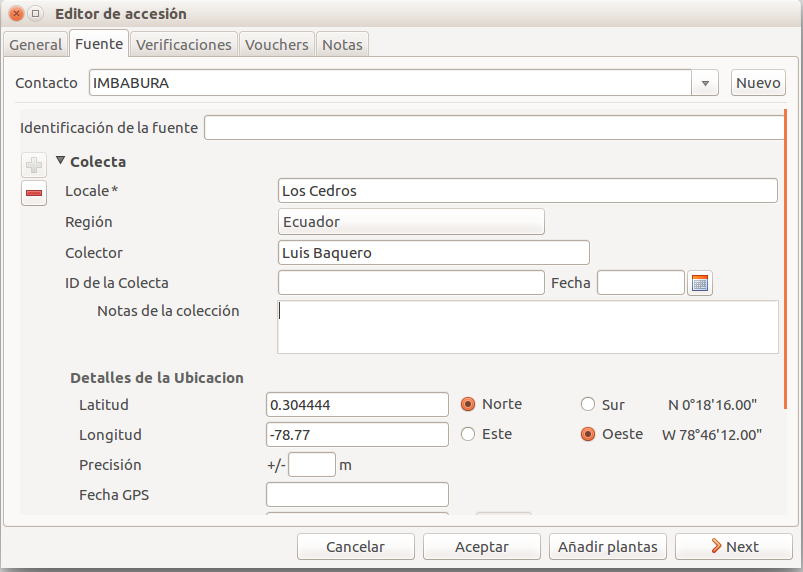
Once you choose or create the contact information, this section deploys more options, here you can specify the region, where you can choose the country of origin, and a specific location within the region, georeferencing information (including the GPS data), habitat description collector name. For the last one, I recommend also to write the specific date next to the collector name (eg. Luis Baquero 11/10/2016).
Donated, bought or confiscated plants
However useful for expeditions or for donors where the main information is geographic, this source tab is not very practical in our remaining cases: we handle three more categories: confiscated, purchased and donated, for these categories the options available in the source tab do not apply: too much information and not to the point.
In these cases, we add a set of notes, according to the case.
— Donated plants
If the plant was donated by individual, we add the individual among our contacts and specify it as source, then we add the notes:
category text source-type gift source-detail Contribución científica al JBQ — Bought plants
If the plant was bought, we add the previous owner among our contacts and specify it as source, then we add the notes:
category text source-type purchase source-detail optional, free text factura the invoice number — Confiscated plants
If the plant was confiscated, we add the previous owner among our contacts and specify it as source, then we add the notes:
category text source-type confiscated source-detail possibly, legal details, law number … Producing or reproducing labels
Refreshing plant labels
Sometimes we refresh the labels, for example all that is in a greenhouse, or maybe just a set of plants because their labels risk becoming unreadable.
In the first case it’s easy selecting all plants in the Location, we just type the location name, or give the search
location like <location name>.The second case it’s a bit trickier. What we do is to create a temporary Tag, and use it to tag all plants that were found in need for a new label.
Given the selection, we start the report tool, using the mako
accession-label.svgtemplate. We reset its options to default values, and since we’re using a simple printer, we set the colour toblackinstead ofblue, which is meant for engraving.Preparing labels for non-database plants
To prepare the batch of 72 labels, we use a mako report template, named
accession-label.svg. This template accepts parameters, this is an example that would produce labels from 025801 all the way to 025872.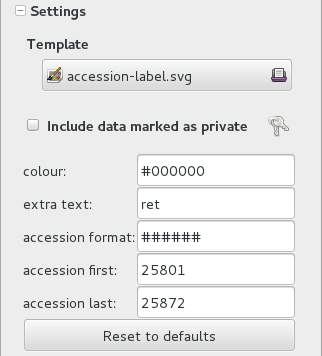
Labels come for us in two flavours: (1) either new plants just being acquired by the garden; (2) or plants in the garden, found without a label. We distinguish the two cases by adding a ‘ret’ extra text for relabeled plants.
We keep two boxes with labels of the two types, ready to be used.
Our garden has two exposition greenhouses, and several warm and cold greenhouses where we keep the largest part of our collection. Plants are moved to the exposition when flowering and back to the “warehouse” when less interesting for the exposition. For each plant in our collection we need to know its current locations and history of movements.
Planned action
The action starts by moving the plants around, and collecting the plant code either on paper, or in our mobile app, if we had one.
We then go to the desktop terminal and revise all plants one by one changing their location in the database. It is important that the date of the location change is correctly memorized, because this tells us how long a plant stays in the exposition.
If we had a mobile app, we would just upload the info to the server and we would be done.
Ex-post correction
While revising the garden, we find a plant at a location that is not what the database says. We update the database information.
For example, the plant belonging to accession “012142”, species “Acineta sp”, was found in “Invernadero 1”, while the database says it is in “ICAlm3”.
All we do is find the Plant in the database and update its information. We do not change anything in the initial Accession information, just the current Plant information.
We type the accession code in the search entry field, with quotes, hit enter. The search results now shows the accession, and it tells us how many plants belong to it. Click on the squared + in the results row, so we now also see a row for the plant belonging to the accession.
Right click on the Plant row, the three options will show: “Edit, Split, Delete”, select Edit, you land in the Plant Editor.
Just correct the Location field, and click on OK.
The InfoBox contains information about the last change to the object:
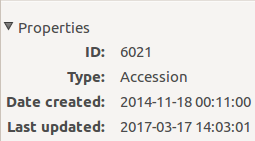
For plants, even more interesting, it builds a history of changes, list that includes Location changes, or Quantity changes.
As plants enter the flowering stage, we can review their identification directly, or we take pictures of details of the flower, hoping that a visiting specialist could help completing the identification.
Adding pictures
We are practicing with ODK Collect, a small program running on hand-held android devices. Ghini’s use of ODK Collect hasn’t yet frozen to a best practice. Do have a look at the corresponding issue on github.
Regularly, we need producing reports about our collection that the Ecuadorian Environment Ministry (MAE) requires and that justify the very existence of the garden.
Producing reports
Each year the botanic garden has to submit a report (annual report of management and maintenance of orchids collection) complying to the requirements of the Ecuadorian Ministry of the Environment.
To this end, we start selecting the plants we have to include in the report. It might be all acquisition in the past year:
accession where _created between |datetime|2017,1,1| and |datetime|2018,1,1|
or all plants within a location, or all plants belonging to a species, or just everything (but this will take time):
plant where location = 'abc'
plant where accession.species.epithet='muricata' and accession.species.genus.epithet='Annona'
plant like %
Having selected the database objects which we want in the report, we start the report tool, which acts on the selection.
Searching the database
You search the database in order to edit the data further, or because you want to produce a report. Anyway you start with typing something in the search field
and you hope to see your result in the search result view.
Search in order to edit (plant or accession)
When searching in order to edit, you want to be very specific, and select as few objects as possible. The most fine-tuned search is the one based on plant number: you know the code, you get one object.
If your plant is not there, the screen would look like this:
Other example, plant
007701.1is in the database: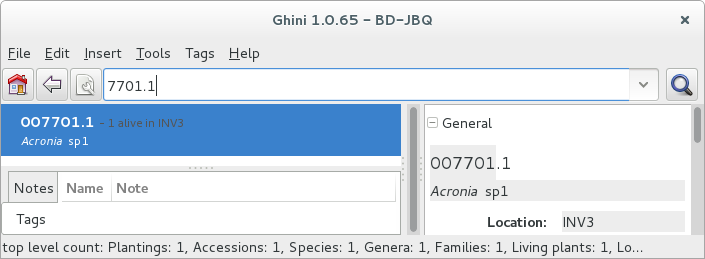
All fields with a darker background in the infobox on the right hand side are hyperlinks to other objects in the database. Clicking on them will either replace the text in the search field and execute the query, or will simply add the object to the results.
Clicking on the accession does the latter.
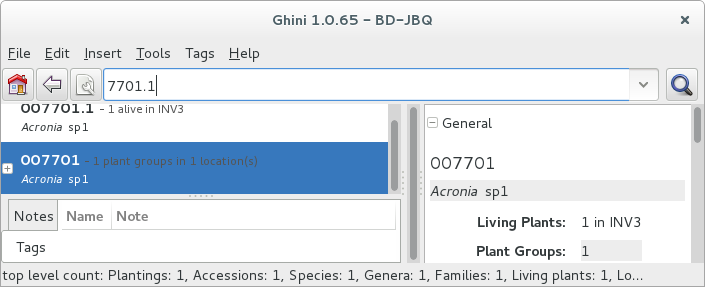
We now have both Plant or Accession in the search result view and we can now edit either or both.
Search in order to report
When searching in order to create a report, you want to be both specific (you don’t want to report about irrelevant objects) and broad (you don’t want to report about a single object).
Sometimes the report itself suggests the query, as for example: all plants in greenhouse 3; or: all plants belonging to endangered species (we store this information in a note associated to the species); or: all plants added to the collection this year;
plant where location.code = INV3
plant where accession.species.notes.note="endangered"
plant where accession._created > |datetime|2017,1,1|
Otherwise a flexible way to achieve this is to work with Tags.
Using Tags as enhanced searching
Sometimes we have to take the same action on objects of the same type, but we don’t manage to quickly think of a search query that would group all that we need and exclude all we do not need.
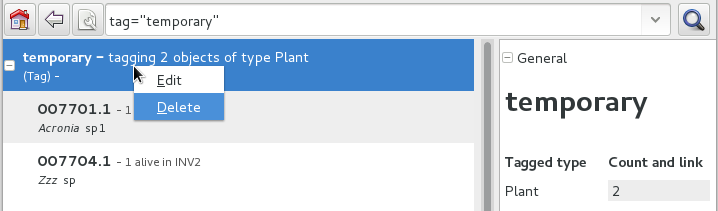
This is one possible use of Tags. We start with a selection, we tag all objects in the selection under a new temporary tag. Let’s say we call it “temporary”.
We continue searching and adding objects to the temporary tag until the tag identifies all that we need.
Finally from the Tags menu we select the one we just created (in our example this corresponds to the search
tag="temporary") and we can invoke the report.When we’re done with a temporary tag, there’s no point in leaving it around, so we just delete it.
Be aware of the available search strategies
This is nicely documented, “più non dimandare” and read the docs.
using ghini for a seed database
We keep getting involved in groups focusing on endagered plant seeds. They want to note down when seeds come in, but also when they go out to people that order the seed.
In ghini, we keep speaking of ›Plants‹, ›Locations‹, while such user groups focus on ›Seeds‹ and ›Jars‹ and ›Drawers‹ and ›Boxes‹ and ›Envelopes‹. So people wonder whether ghini could be adapted to their use case, or for directions on how to develop their own database.
Does ghini need being adapted for such a seed database?
no it doesn’t need any adaptation, it’s just that you need to read some of its terms differently.
the taxonomy part is just taxonomy, plant species information, no need to explain that, no way to interpret it otherwise.
›Accessions‹ and ›Plants‹, you know what an ›Accession‹ is, but since you’re consistently handling ›Plants‹ still only in seed form, the Wikipedia explanation of an accession sounds like this: it is a seed or group of seeds that are of the same taxon, are of the same propagule type (or treatment), were received from the same source, were received at the same time.
If you hold seeds in jars, or in other sort of containers that is able to hold hundreds of seeds, please make sure that a jar contains seeds of just one accession, as above described: same taxon, same treatment, same source, same time.
Each one of your ›Jars‹ of seeds is in ghini speak a ›Plant‹, and the amount of seeds in the ›Jar‹ is the ›Plant‹ ›quantity‹. An ›Envelope‹ is just the same as a ›Jar‹: a container of seeds from the same ›Accession‹, just presumably smaller.
A ›Box‹ (where you keep several ›Envelopes‹) or a ›Drawer‹ (where you keep several ›Jars‹) are in ghini speak a ›Location‹.
Since a ›Jar‹ or an ›Envelope‹ contains seeds from an ›Accession‹, you will clearly label it with its ›Accession‹ code (and trailing ›Plant‹ number). You might write the amount of seeds, too, but this would be repeating information from the database, and repeating information introduces an inconsistency risk factor.
How do I handle receiving a batch of seeds?
Note
When we receive seeds, we either collect them ourselves, or we receive it from an other seed collector. We handle receiving them possibly on the spot, or with a small delay. Even when handled together with several other batches of seeds we received, each batch keeps its individuality.
We want to be later able to find back, for example, how many seeds we still have from a specific batch, or when we last received seeds from a specific source.
As long as you put this information in the database, as long as you follow the same convention when doing so, you will be able to write and execute such queries using ghini.
One possibility, the one described here, is based on ›Notes‹. (Ghini does not, as yet, implement the concept “Acquisition”. There is an issue related to the Acquisition and Donation objects, but we haven’t quite formalized things yet.)
You surely already use codes to identify a batch of seeds entering the seed bank. Just copy this code in a ›Note‹, category ‘received’, to each ›Accession‹ in the received batch. This will let you select the ›Accessions‹ by the query:
accession where notes[category='received'].note='<your code>'Use the ‘Source’ tab if you think so, it offers space for indicating an external source, or an expedition. When receiving from an external source, you can specify the code internal to their organization. This will be useful when requesting an extra batch.
How do I handle sending seeds?
what you physically do is to grab the desired amount of seeds of the indicated species from a jar, put it in an envelope and send it. what you do from a point of view of the database is exactly the same, but precisely described in a protocol:
- Use the database to identify the ›Jar‹ containing the desired amount of the right seeds.
- remove that amount of seeds from the ›Jar‹ (decrement the quantity),
- put the seeds in an ›Envelope‹ (yes, that’s a database object).
- send the envelope (but keep it in the database).
this in short.
When I send seeds, it’s not just one bag, how does ghini help me keeping things together?
There’s two levels of keeping things together: one is while you’re preparing the sending, and then for later reference.
While preparing the sending, we advise you use a temporary ›Tag‹ on the objects being edited.
For later reference, you will have common ›Note‹ texts, to identify received and sent batches.
Can you give a complete example?
Right. Quite fair. Let’s see…
Say you were requested to deliver 50 seeds of Parnassia palustris, 30 of Gentiana pneumonanthe, 80 of Fritillaria meleagris, and 30 of Hypericum pulchrum.
step 1
The first step is to check the quantities you have in house, and if you do have enough, where you have them. You do this per requested species:
accession where species.genus.epithet=Parnassia and species.epithet=palustris and sum(plants.quantity)>0Expand in the results pane the ›Accession‹ from which you want to grab the seeds, so you see the corresponding ›Jars‹, highlight one, and tag it with a new ›Tag‹. To do this the first time, go through the steps, just once, of creating a new ›Tag‹. The new tag becomes the active tag, and subsequent tagging will be speedier. I would call the tag ›sending‹, but that’s only for ease of exposition and further completely irrelevant.
Repeat the task for Gentiana pneumonanthe, Fritillaria meleagris, Hypericum pulchrum:
accession where species.genus.epithet=Gentiana and species.epithet=pneumonanthe and sum(plants.quantity)>0
accession where species.genus.epithet=Fritillaria and species.epithet=meleagris and sum(plants.quantity)>0
accession where species.genus.epithet=Hypericum and species.epithet=pulchrum and sum(plants.quantity)>0
Again highilight the accession from which you can grab seeds, and hit Ctrl-Y (this tags the highighted row with the active tag). Don’t worry if nothing seems to happen when you hit Ctrl-Y, this is a silent operation.
step 2
Now we prepare to go to the seeds bank, with the envelopes we want to fill.
Select the ›sending‹ ›Tag‹ from the tags menu, this will bring back in the results pane all the tagged ›Plants‹ (›Jars‹ or ›Envelopes‹), and will tell you in which ›Location‹ (›Drawer‹ or ›Box‹) they are to be found. Write this information on each of your physical envelopes. Write also the ›Species‹ name, and the quantity you can provide.
Walk now to your seeds bank and, for each of the envelopes you just prepared, open the ›Location‹, grab the ›Plant‹, extract the correct amount of seeds, put them in your physical envelope.
And back to the database!
step 3
If nobody used your workstation, you still have the Tag in the results pane, and it’s expanded so you see all the individual plants you tagged.
One by one, you have to ›split‹ the plant. This is a standard operation that you activate by right-clicking on the plant.
A plant editor window comes in view, in ‘split mode’.
Splitting a plant lets you create a database image of the plant group you just physically created, eg: it lets you subtract 30 items from the Gentiana pneumonanthe plant (group number one, that is the one in the jar), and create a new plant group for the same accession. A good practice would be to specify as ›Location‹ for this new plant the ‘out box’, that is, the envelope is on its way to leave the garden.
Don’t forget to delete the temporary ‘sending’ ›Tag‹.
step 4
Final step, it represents the physical step of sending the envelope, possibly together with several other envelopes, in a single sending, which should have a code.
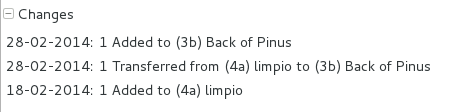
Just as you did when you received a batch of plants, you work with notes, this time the category is ‘sent’, and the note text is whatever you normally do to identify a sending. So suppose you’re doing a second sending to Pino in 2018, you add the note to each of the newly created envelopes: category ‘sent’, text: ‘2018-pino-002’.
When you finally do send the envelopes, these stop being part of your collection. You still want to know that they have existed, but you do not want to count them among the seeds that are available to you.
Bring back all the plants in the sending ‘2018-pino-002’:
plant where notes[category='sent'].note = '2018-pino-002'You now need to edit them one by one, mark the ›quantity‹ to zero, and optionally specify the reason of the change, which would be ›given away‹, and the recipient is already specified in the ‘sent’ ›Note‹.
This last operation could be automated, we’re thinking of it, it would become a script, acting on a selection. Stay tuned.