Importing and Exporting Data
Although Ghini can be extended through plugins to support alternate import and export formats, by default it can only import and export comma separated values files or CSV.
There is some support for exporting to the Access for Biological Collections Data it is limited.
There is also limited support for exporting to an XML format that more or less reflects exactly the tables and row of the database.
Exporting ABCD and XML will not be covered here.
Warning
Importing files will most likely destroy any data you have in the database so make sure you have backed up your data.
Importing from CSV
In general it is best to only import CSV files into Ghini that were previously exported from Ghini. It is possible to import any CSV file but that is more advanced that this doc will cover.
To import CSV files into Ghini select from the menu.
After clicking OK on the dialog that ask if you are sure you know what you’re doing a file chooser will open. In the file chooser select the files you want to import.
Exporting to CSV
To export the Ghini data to CSV select from the menu.
This tool will ask you to select a directory to export the CSV data. All of the tables in Ghini will be exported to files in the format tablename.txt where tablename is the name of the table where the data was exported from.
Importing from JSON
This is the way to import data into an existing database, without destroying previous content. A typical example of this functionality would be importing your digital collection into a fresh, just initialized Ghini database. Converting a database into bauble json interchange format is beyond the scope of this manual, please contact one of the authors if you need any further help.
Using the Ghini json interchange format, you can import data which you have exported from a different Ghini installation.
Exporting to JSON
This feature is still under development.
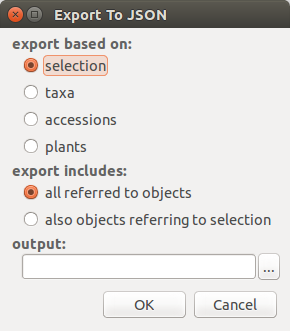
when you activate this export tool, you are given the choice to specify what to export. You can use the current selection to limit the span of the export, or you can start at the complete content of a domain, to be chosen among Species, Accession, Plant.
Exporting Species will only export the complete taxonomic information in your database. Accession will export all your accessions plus all the taxonomic information it refers to: unreferred to taxa will not be exported. Plant will export all living plants (some accession might not be included), all referred to locations and taxa.
Importing from a Generic Database
This functionality is the object of issue #127, for which we have no generic solution yet.
If you’re interested in importing data from some flat file (e.g.: Excel spreadsheet) or from any database, contact the developers.
Importing a Pictures Collection
We can consider a collection of plant pictures as a particular form of botanical database, in which each picture is clearly associated with one specific plant.
Even without using a photo collection software, you can associate pictures to accessions by following one and the same clear rule when naming picture files.
For example, 2018.0020.1 (4) Epidendrum.jpg would be the
name of the fourth picture for plant number 1 within accession
2018.0020, identified to rank genus as an Epidendrum.
The functionality here described is meant for importing an ordered collection of plant pictures either to initialize a ghini database, or for periodically adding to it.
Use to activate this
import tool. Import goes in several steps: parameter
definition; data revision and confirmation; the import step
proper; finally review the import log. At the first two steps
you can confirm the data and go to the next step by clicking on
the next button, or you can go back to the previous step by
clicking on the prev button. Once the import is done and
you’re reviewing the log, you can only either confirm —or abort—
the whole transaction.
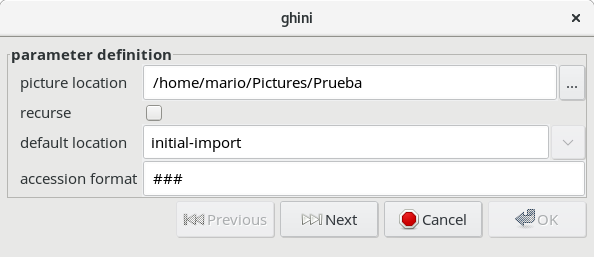
In the “parameter definition” pane you: select the directory from which you intend to import pictures; indicate whether to import pictures recursively; select or create a location which will be used as default location for new plants; inform the tool about the rule you’ve been following when naming picture files.
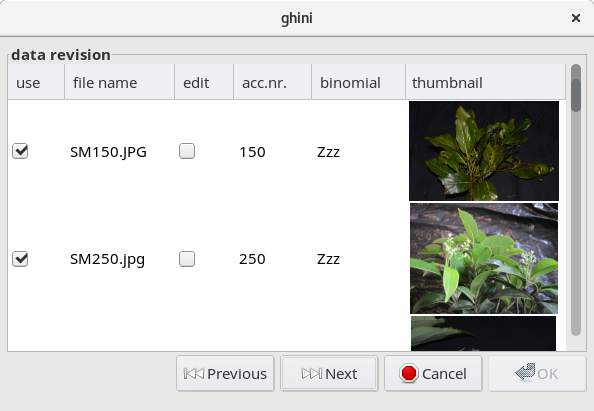
In the “data revision” pane you are shown a table with as many rows as the pictures you are importing. Each row holds as much information as the tool managed to extract from the picture name. You can review the information, correct or confirm, and indicate whether or not the row should be imported.
In the final “commit or rollback” pane you read the logs relative to your data import, and decide whether to keep them (commit them to the database), or undo them (rollback the transaction).
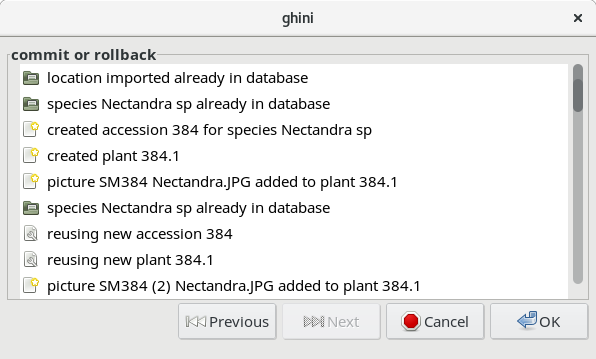
When the Picture Collection importer creates or updates objects, it also sets a Note that you can use for selecting the objects involved in the import, and for reviewing if needed.