Initial Configuration
After a successful installation, more complex organizations will need configure their database, and configure Ghini according to their database configuration. This page focuses on this task. If you don’t know what this is about, please do read the part relative to SQLite.
Should you SQLite?
Is this the first time you use Ghini, are you going to work in a stand-alone setting, you have not the faintest idea how to manage a database management system? If you answered yes to any of the previous, you probably better stick with SQLite, the easy, fast, zero-administration file-based database.
With SQLite, you do not need any preparation and you can continue with connecting.
On the other hand, if you want to connect more than one bauble workstation to the same database, or if you want to make your data available for other clients, as could be a web server in a LAMP setting, you should consider keeping your database in a database management system like PostgreSQL or MySQL/MariaDB, both supported by Ghini.
When connecting to a database server as one of the above, you have to
manually do the following: Create at least one user; Create your database;
Give at least one user full permissions on your database; If you plan having
more database users: Give one of your users the CREATEROLE privilege;
Consider the user with the CREATEROLE privilege as a super-user, not
meant to handle data directly; Keep your super-user credentials in a very
safe place.
When this is done, Ghini will be able to proceed, creating the tables and importing the default data set. The process is database-dependent and it falls beyond the scope of this manual.
If you already got the chills or sick at your stomach, no need to worry, just stick with SQLite, you do not miss on features nor performance.
Some more hints if you need PostgreSQL
Start simple, don’t do all at the same time. Review the online manual, or download and study the offline version.
As said above, create a database, a user, make this user the owner of the database, decide whether you’re going to need multiple users, and preferably reserve a user for database and normal user creation. This super-user should be your only user with
CREATEROLEprivilege.All normal users will need all privileges on all tables and sequences, something you can do from the menu. If you have any difficulty, please open an issue about it.
Connect using the
psqlinteractive terminal. Create a~/.pgpassfile (read more about it in the manual), tweak yourpg_hba.confandpostgresql.conffiles, until you can connect using the command:psql <mydb> --username <myuser> --no-password --host <mydbhost>With the above setup, connecting from ghini will be an obvious task.
Connecting to a database
When you start Ghini the first thing that comes up is the connection dialog.
Quite obviously, if this is the first time you start Ghini, you have no connections yet and Ghini will alert you about it.
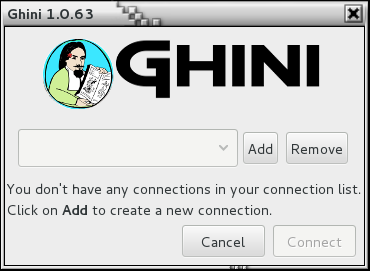
This alert will show at first activation and also in the future if your connections list becomes empty. As it says: click on Add to create your first connection.
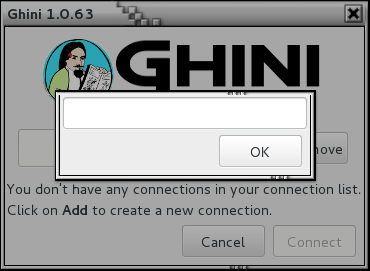
Just insert a name for your connection, something meaningful you associate with the collection to be represented in the database (for example: “my home garden”), and click on OK. You will be back to the previous screen, but your connection name will be selected and the Connection Details will have expanded.
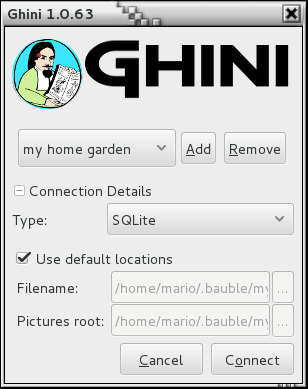
specify the connection details
If you do not know what to do here, Ghini will help you stay safe. Activate the Use default locations check box and create your first connection by clicking on Connect.
You may safely skip the remainder of this section for the time being and continue reading to the following section.
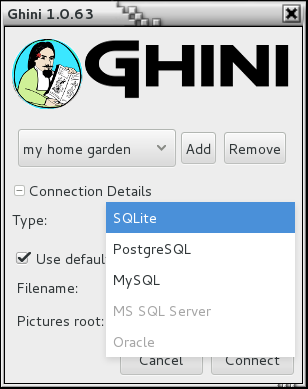
fine-tune the connection details
By default Ghini uses the file-based SQLite database. During the installation process you had the choice (and you still have after installation), to add database connectors other than the default SQLite.
In this example, Ghini can connect to SQLite, PostgreSQL and MySQL, but no connector is available for Oracle or MS SQL Server.
If you use SQLite, all you really need specify is the connection name. If
you let Ghini use the default filename then Ghini creates a database file
with the same name as the connection and .db extension, and a pictures
folder with the same name and no extension, both in ~/.bauble on
Linux/MacOSX or in AppData\Roaming\Bauble on Windows.
Still with SQLite, you might have received or downloaded a bauble database, and you want to connect to it. In this case you do not let Ghini use the default filename, but you browse in your computer to the location where you saved the Ghini SQLite database file.
If you use a different database connector, the dialog box will look different and it will offer you the option to fine tune all parameters needed to connect to the database of your choice.
If you are connecting to an existing database you can continue to Editing and Inserting Data and subsequently searching-in-ghini, otherwise read on to the following section on initializing a database for Ghini.
If you plan to associate pictures to plants, specify also the pictures root folder. The meaning of this is explained in further detail at Pictures in Editing and Inserting Data.
A sample SQLite database
Indeed we have a sample database, from our pilot garden “El Cuchubo”, in Mompox, Colombia. We have a zipped sample database for ghini-1.0.
Download and unzip it to the location of your choice, then start Ghini, create a connection named possibly
cuchubo, orsample, and edit the Connection Details. Keep the connection type at the default SQLite, but instead of using the default locations, make sure that Filename points to your unpackedcuchubo.dbfile.
Initialize a database
First time you open a connection to a database which had never been seen by Ghini before, Ghini will first display an alert:
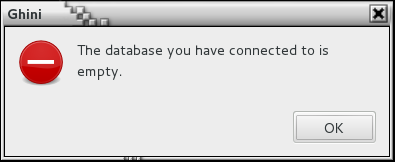
immediately followed by a question:
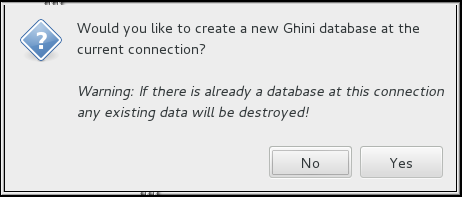
Be careful when manually specifying the connection parameters: the values you have entered may refer to an existing database, not intended for use with Ghini. By letting Ghini initialize a database, the database will be emptied and all of its content be lost.
If you are sure you want to create a database at this connection then select “Yes”. Ghini will then start creating the database tables and importing the default data. This can take a minute or two so while all of the default data is imported into the database so be patient.
Once your database has been created, configured, initialized, you are ready to start Editing and Inserting Data and subsequently Searching in Ghini.