Developer’s Manual
Helping Ghini development
Installing Ghini always includes downloading the sources, connected to the github repository. This is so because in our eyes, every user is always potentially also a developer.
If you want to contribute to Ghini, you can do so in quite a few different ways:
- Use the software, note the things you don’t like, open an issue for each of them. A developer will react sooner than you can imagine.
- If you have an idea of what you miss in the software but can’t quite formalize it into separate issues, you could consider hiring a professional. This is the best way to make sure that something happens quickly on Ghini. Do make sure the developer opens issues and publishes their contribution on github.
- Translate! Any help with translations will be welcome, so please do! you can do this without installing anything on your computer, just using the on-line translation service offered by http://hosted.weblate.org/
- fork the respository, choose an issue, solve it, open a pull request. See the bug solving workflow below.
If you haven’t yet installed Ghini, and want to have a look at its code history, you can open our github project page and see all that has been going on around Ghini since its inception as Bauble, back in the year 2004.
Software source, versions, branches
If you want a particular version of Ghini, we release and maintain versions
as branches. You should git checkout the branch corresponding to the
version of your choice.
production line
Branch names for Ghini stable (production) versions are of the form
ghini-x.y (eg: ghini-3.1); branch names where Ghini testing versions are
published are of the form ghini-x.y-dev (eg: ghini-3.1-dev).
Development Workflow
Our workflow is to continuously commit to the testing branch, to often push them to github, to let travis-ci and coveralls.io check the quality of the pushed testing branches, finally, from time to time, to merge the testing branch into the corresponding release.
When working at larger issues, which seem to take longer than a couple of days, I might open a branch associated to the issue. I don’t do this very often.
larger issues
When facing a single larger issue, create a branch tag at the tip of a main
development line (e.g.: ghini-3.1-dev), and follow the workflow
described at
https://git-scm.com/book/en/v2/Git-Branching-Basic-Branching-and-Merging
in short:
git up
git checkout -b issue-xxxx
git push origin issue-xxxx
Work on the new temporary branch. When ready, go to github, merge the branch with the main development line from which you branched, solve conflicts where necessary, delete the temporary branch.
When ready for publication, merge the development line into the corresponding production line.
Updating the set of translatable strings
From time to time, during the process of updating the software, you will be
adding or modifying strings in the python sources, in the documentation, in
the glade sources. Most of our strings are translatable, and are offered to
weblate for people to contribute, in the form of several .po files.
A po is mostly composed of pairs of text portions, original and
translation, and is specific to a target language. When a translator adds a
translation on weblate, this reaches our repository on github. When a
programmer adds a string to the software, this reaches weblate as “to be
translated”.
Weblate hosts the Ghini project. Within this project we have components, each of which corresponds to a branch of a repository on github. Each component accepts translations in several languages.
| component | repository | branch |
|---|---|---|
| Desktop 1.0 | ghini.desktop | ghini-1.0-dev |
| Desktop 3.1 | ghini.desktop | ghini-3.1-dev |
| Documentation 1.0 | ghini.desktop-docs.i18n | ghini-1.0-dev |
| Documentation 3.1 | ghini.desktop-docs.i18n | ghini-3.1-dev |
| Web 1.2 | ghini.web | master |
| ghini.pocket | master |
To update the po files relative to the software, you set the working
directory to the root of your checkout of ghini.desktop, and you run the
script:
./scripts/i18n.sh
To update the po files relative to the documentation, you set the
working directory to the root of your checkout of ghini.desktop-docs.i18n,
and you run the script:
./doc/runme.sh
When you run either of the above mentioned scripts, chances are you need to
commit all po files in the project. You may want to review the changes
before committing them to the respository. This is most important when you
perform a marginal correction to a string, like removing a typo.
Something that happens: running into a conflict. Solving conflicts is not difficult once you know how to do that. First of all, add weblate as remote:
git remote add weblate-doc10 https://hosted.weblate.org/git/ghini/documentation-10/
Then make sure we are in the correct repository, on the correct branch, update the remote, merge with it:
git checkout ghini-3.1-dev
git remote update
git merge weblate-doc10/ghini-3.1-dev
Our documentation on readthedocs has an original English version, and several translations. We just follow the description of localisation, there’s nothing that we invented ourselves here.
Readthedocs checks the project’s Language setting, and invokes
sphinx-intl to produce the formatted documentation in the target
language. With the default configuration —which we did not alter—
sphinx-intl expects one po file per source document, named as the
source document, and that they all reside in the directory
local/$(LANG)/LC_MESSAGES/.
On the other hand, Weblate (and ourselves) prefers a single po file per
language, and keeps them all in the same /po directory, just as we do
for the software project: /po/$(LANG).po.
In order not to repeat information, and to let both systems work their natural way, we have two sets of symbolic links (git honors them).
To summarise: when a file in the documentation is updated, the runme.sh
script will:
- copy the
rstfiles from the software to the documentation; - create a new
potfile for each of the documentation files; - merge all
potfiles into onedoc.pot; - use the updated
doc.potto update alldoc.pofiles (one per language); - create all symbolic links:
- those expected by
sphinx-intlin/local/$(LANG)/LC_MESSAGES/ - those used by weblate in
/po/$(LANG).po
- those expected by
We could definitely write the above in a Makefile, or even better include it
in /doc/Makefile. Who knows, maybe we will do that.
Producing the docs locally
The above description is about how we help external sites produce our documentation so that it is online for all to see. But what if you want to have the documentation locally, for example if you want to edit and review before pushing your commits to the cloud?
In order to run sphinx locally, you need to install it within the same virtual environment as ghini, and to install it there, you need to have a sphinx version whose dependencies don not conflict with ghini.desktop’s dependecies.
What we do to keep this in order?
We state this extra dependency in the setup.py file, as an
extras_require entry. Create and activate the virtual environment, then
run easy_install ghini.desktop[docs]. This gets you the sphinx version
as declared in the setup.py file.
If all you want is the html documentation built locally, run ./setup.py
install docs. For more options, enter the doc directory and run
make.
Which way do the translated strings reach our users?
A new translator asked the question, adding: »Is this an automated process from Weblate –> GIT –> Ghini Desktop installed on users computers, or does this require manual steps?
The aswer is that the whole interaction is quite complex, and it depends on the component.
When it comes to ghini.desktop, when you do a global installation, you
don’t know which language your users will set up their environment, and a
user can change the language configuration any time. So what we do is to
install the software in English together with a translation table from
English to whatever else, in particular Italian or Hungarian. Then the GUI
libraries (Android or GTK) know where to look for the translation strings.
These translation tables are generated during the installation or upgrade
process, based on the strings you see on Weblate.
Before any of the above gets activated, the path followed by your translations is as you describe: Weblate pushes the strings to github, directly into the development line ghini-3.1-dev; I see them, if I understand at least the structure of that language I review them, maybe I look them up in wikipedia or get them translated back to Italian, Spanish or English by some automatic translation service; sometimes I need to solve conflicts arising because of changed context, not too often fortunately; from time to time I publish the development line ghini-3.1-dev to the production line ghini-3.1, and this is the moment when the new translations finally make it to the distributed software.
users will notice a new version available warning and can decide to ignore it, or to update.
For ghini.pocket, there is no notification to end users, since we’re not
yet using the google app store.
For ghini.web, we haven’t yet defined how to distribute it.
For ghini’s documentation, it’s completely automatic, and all is handled by readthedocs.org.
Adding missing unit tests
If you are interested contributing to development of Ghini, a good way to do so would be by helping us finding and writing the missing unit tests.
A well tested function is one whose behaviour you cannot change without breaking at least one unit test.
We all agree that in theory theory and practice match perfectly and that one first writes the tests, then implements the function. In practice, however, practice does not match theory and we have been writing tests after writing and even publishing the functions.
This section describes the process of adding unit tests for
bauble.plugins.plants.family.remove_callback.
What to test
First of all, open the coverage report index, and choose a file with low coverage.
For this example, run in October 2015, we landed on
bauble.plugins.plants.family, at 33%.
https://coveralls.io/builds/3741152/source?filename=bauble%2Fplugins%2Fplants%2Ffamily.py
The first two functions which need tests, edit_callback and
add_genera_callback, include creation and activation of an object
relying on a custom dialog box. We should really first write unit tests for
that class, then come back here.
The next function, remove_callback, also activates a couple of dialog
and message boxes, but in the form of invoking a function requesting user
input via yes-no-ok boxes. These functions we can easily replace with a
function mocking the behaviour.
how to test
So, having decided what to describe in unit test, we look at the code and we see it needs discriminate a couple of cases:
- parameter correctness
- the list of families has no elements.
- the list of families has more than one element.
- the list of families has exactly one element.
- cascade
- the family has no genera
- the family has one or more genera
- confirm
- the user confirms deletion
- the user does not confirm deletion
- deleting
- all goes well when deleting the family
- there is some error while deleting the family
I decide I will only focus on the cascade and the confirm aspects. Two binary questions: 4 cases.
where to put the tests
Locate the test script and choose the class where to put the extra unit tests.
https://coveralls.io/builds/3741152/source?filename=bauble%2Fplugins%2Fplants%2Ftest.py#L273
what about skipped tests
TheFamilyTestsclass contains a skipped test, implementing it will be quite a bit of work because we need rewrite the FamilyEditorPresenter, separate it from the FamilyEditorView and reconsider what to do with the FamilyEditor class, which I think should be removed and replaced with a single function.
writing the tests
After the last test in the FamilyTests class, I add the four cases I want to describe, and I make sure they fail, and since I’m lazy, I write the most compact code I know for generating an error:
def test_remove_callback_no_genera_no_confirm(self):
    1/0

def test_remove_callback_no_genera_confirm(self):
    1/0

def test_remove_callback_with_genera_no_confirm(self):
    1/0

def test_remove_callback_with_genera_confirm(self):
    1/0
One test, step by step
Let’s start with the first test case.
When writing tests, I generally follow the pattern:
- T₀ (initial condition),
- action,
- T₁ (testing the result of the action given the initial conditions)
what’s in a name — unit tests
There’s a reason why unit tests are called unit tests. Please never test two actions in one test.
So let’s describe T₀ for the first test, a database holding a family without genera:
def test_remove_callback_no_genera_no_confirm(self):
    f5 = Family(family=u'Arecaceae')
    self.session.add(f5)
    self.session.flush()
We do not want the function being tested to invoke the interactive
utils.yes_no_dialog function, we want remove_callback to invoke a
non-interactive replacement function. We achieve this simply by making
utils.yes_no_dialog point to a lambda expression which, like the
original interactive function, accepts one parameter and returns a
boolean. In this case: False:
def test_remove_callback_no_genera_no_confirm(self):
    # T_0
    f5 = Family(family=u'Arecaceae')
    self.session.add(f5)
    self.session.flush()

    # action
    utils.yes_no_dialog = lambda x: False
    from bauble.plugins.plants.family import remove_callback
    remove_callback(f5)
Next we test the result.
Well, we don’t just want to test whether or not the object Arecaceae was
deleted, we also should test the value returned by remove_callback, and
whether yes_no_dialog and message_details_dialog were invoked or
not.
A lambda expression is not enough for this. We do something apparently
more complex, which will make life a lot easier.
Let’s first define a rather generic function:
def mockfunc(msg=None, name=None, caller=None, result=None):
    caller.invoked.append((name, msg))
    return result
and we grab partial from the functools standard module, to partially
apply the above mockfunc, leaving only msg unspecified, and use this
partial application, which is a function accepting one parameter and
returning a value, to replace the two functions in utils. The test
function now looks like this:
def test_remove_callback_no_genera_no_confirm(self):
    # T_0
    f5 = Family(family=u'Arecaceae')
    self.session.add(f5)
    self.session.flush()
    self.invoked = []

    # action
    utils.yes_no_dialog = partial(
        mockfunc, name='yes_no_dialog', caller=self, result=False)
    utils.message_details_dialog = partial(
        mockfunc, name='message_details_dialog', caller=self)
    from bauble.plugins.plants.family import remove_callback
    result = remove_callback([f5])
    self.session.flush()
The test section checks that message_details_dialog was not invoked,
that yes_no_dialog was invoked, with the correct message parameter, that
Arecaceae is still there:
# effect
self.assertFalse('message_details_dialog' in
                 [f for (f, m) in self.invoked])
self.assertTrue(('yes_no_dialog', u'Are you sure you want to '
                 'remove the family <i>Arecaceae</i>?')
                in self.invoked)
self.assertEquals(result, None)
q = self.session.query(Family).filter_by(family=u"Arecaceae")
matching = q.all()
self.assertEquals(matching, [f5])
And so on
there are two kinds of people, those who complete what they start, and so on
Next test is almost the same, with the difference that the
utils.yes_no_dialog should return True (this we achieve by
specifying result=True in the partial application of the generic
mockfunc).
With this action, the value returned by remove_callback should be
True, and there should be no Arecaceae Family in the database any more:
def test_remove_callback_no_genera_confirm(self):
    # T_0
    f5 = Family(family=u'Arecaceae')
    self.session.add(f5)
    self.session.flush()
    self.invoked = []

    # action
    utils.yes_no_dialog = partial(
        mockfunc, name='yes_no_dialog', caller=self, result=True)
    utils.message_details_dialog = partial(
        mockfunc, name='message_details_dialog', caller=self)
    from bauble.plugins.plants.family import remove_callback
    result = remove_callback([f5])
    self.session.flush()

    # effect
    self.assertFalse('message_details_dialog' in
                     [f for (f, m) in self.invoked])
    self.assertTrue(('yes_no_dialog', u'Are you sure you want to '
                     'remove the family <i>Arecaceae</i>?')
                    in self.invoked)
    self.assertEquals(result, True)
    q = self.session.query(Family).filter_by(family=u"Arecaceae")
    matching = q.all()
    self.assertEquals(matching, [])
have a look at commit 734f5bb9feffc2f4bd22578fcee1802c8682ca83 for the other two test functions.
Testing logging
Our bauble.test.BaubleTestCase objects use handlers of the class
bauble.test.MockLoggingHandler. Every time an individual unit test is
started, the setUp method will create a new handler and associate it
to the root logger. The tearDown method takes care of removing it.
You can check for presence of specific logging messages in
self.handler.messages. messages is a dictionary, initially empty,
with two levels of indexation. First the name of the logger issuing the
logging record, then the name of the level of the logging record. Keys are
created when needed. Values hold lists of messages, formatted according to
whatever formatter you associate to the handler, defaulting to
logging.Formatter("%(message)s").
You can explicitly empty the collected messages by invoking
self.handler.clear().
Putting all together
From time to time you want to activate the test class you’re working at:
nosetests bauble/plugins/plants/test.py:FamilyTests
And at the end of the process you want to update the statistics:
./scripts/update-coverage.sh
Structure of user interface
The user interface is built according to the Model — View — Presenter architectural pattern. For much of the interface, Model is a SQLAlchemy database object, but we also have interface elements where there is no corresponding database model. In general:
The View is described as part of a glade file. This should include the signal-callback and ListStore-TreeView associations. Just reuse the base class
GenericEditorViewdefined inbauble.editor. When you create your instance of this generic class, pass it the glade file name and the root widget name, then hand this instance over to the presenter constructor.In the glade file, in the
action-widgetssection closing your GtkDialog object description, make sure everyaction-widgetelement has a validresponsevalue. Use valid GtkResponseType values, for example:- GTK_RESPONSE_OK, -5
- GTK_RESPONSE_CANCEL, -6
- GTK_RESPONSE_YES, -8
- GTK_RESPONSE_NO, -9
There is no easy way to unit test a subclassed view, so please don’t subclass views, there’s really no need to.
In the glade file, every input widget should define which handler is activated on which signal. The generic Presenter class offers generic callbacks which cover the most common cases.
- GtkEntry (one-line text entry) will handle the
changedsignal, with eitheron_text_entry_changedoron_unique_text_entry_changed. - GtkTextView: associate it to a GtkTextBuffer. To handle the
changedsignal on the GtkTextBuffer, we have to define a handler which invokes the genericon_textbuffer_changed, the only role for this function is to pass our generic handler the name of the model attribute that receives the change. This is a workaroud for an unresolved bug in GTK. - GtkComboBox with translated texts can’t be easily handled from the glade
file, so we don’t even try. Use the
init_translatable_combomethod of the genericGenericEditorViewclass, but please invoke it from the presenter.
The Model is just an object with known attributes. In this interaction, the model is just a passive data container, it does nothing more than to let the presenter modify it.
The subclassed Presenter defines and implements:
widget_to_field_map, a dictionary associating widget names to name of model attributes,view_accept_buttons, the list of widget names which, if activated by the user, mean that the view should be closed,- all needed callbacks,
- optionally, it plays the model role, too.
The presenter continuously updates the model according to changes in the view. If the model corresponds to a database object, the presenter commits all model updates to the database when the view is closed successfully, or rolls them back if the view is canceled. (this behaviour is influenced by the parameter
do_commit)If the model is something else, then the presenter will do something else.
Note
A well behaved presenter uses the view api to query the values inserted by the user or to forcibly set widget statuses. Please do not learn from the practice of our misbehaving presenters, some of which directly handle fields of
view.widgets. By doing so, these presenters prevents us from writing unit tests.
The base class for the presenter, GenericEditorPresenter defined in
bauble.editor, implements many useful generic callbacks. There is a
MockView class, that you can use when writing tests for your presenters.
Examples
Contact and ContactPresenter are implemented following the above
lines. The view is defined in the contact.glade file.
A good example of Presenter/View pattern (no model) is given by the connection manager.
We use the same architectural pattern for non-database interaction, by
setting the presenter also as model. We do this, for example, for the JSON
export dialog box. The following command will give you a list of
GenericEditorView instantiations:
grep -nHr -e GenericEditorView\( bauble
Data streams between software components
Let’s start by recalling the composition of the Ghini family, as shown in the diagram:
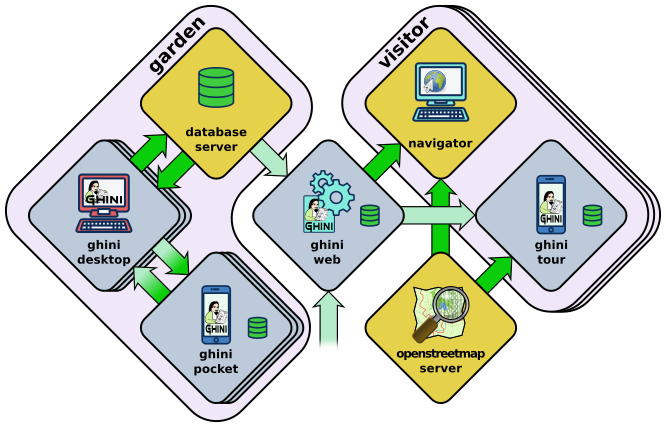
When we first introduced the diagram, we did not explain the reason why different arrows representing different data flows, had different colours: some are deep green, some in a lighter tint. If you suspected this bore a meaning then you were quite right:
Deeper green streams are constant flows of data, representing the core activity of a component, eg: the interaction between ghini.desktop and its database server, or your internet browser and ghini.web.
Lighter green streams are import/export actions, initiated by the user at the command panel of ghini.desktop, or in the ghini.tour settings page.
This is the same graph, in which all import data streams have been given an identifier.
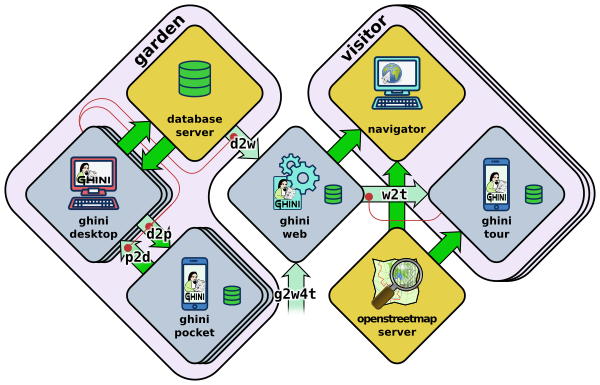
| name | description |
|---|---|
| d2p | This is ghini.desktop’s . |
| p2d | Import from the ghini.pocket log file and pictures into the central database. |
| d2w | Offer a selection of your garden data to a central ghini.web site, so online virtual visitors can browse it. This includes plant identification and their geographic location. |
| g2w | Write geographic information about non-botanic data (ie: point of interest within the garden, required by ghini.tour) in the central ghini.web site. |
| w2t | Importing locations and points of interest from ghini.web to tour. |
We formally define all named streams, so our we know we are talking about. Moreover, streams impacting the desktop and web databases require extra thought and attention from your database manager.
Extending Ghini with Plugins
Nearly everything about Ghini is extensible through plugins. Plugins can create tables, define custom searchs, add menu items, create custom commands and more.
To create a new plugin you must extend the bauble.pluginmgr.Plugin
class.
The Tag plugin is a good minimal example, even if the TagItemGUI
falls outside the Model-View-Presenter architectural pattern.
Plugins structure
Ghini is a framework for handling collections, and is distributed along with a set of plugins making Ghini a botanical collection manager. But Ghini stays a framework and you could in theory remove all plugins we distribute and write your own, or write your own plugins that extend or complete the current Ghini behaviour.
Once you have selected and opened a database connection, you land in the Search window. The Search window is an interaction between two objects: SearchPresenter (SP) and SearchView (SV).
SV is what you see, SP holds the program status and handles the requests you express through SV. Handling these requests affect the content of SV and the program status in SP.
The search results shown in the largest part of SV are rows, objects that are instances of classes registered in a plugin.
Each of these classes must implement an amount of functions in order to properly behave within the Ghini framework. The Ghini framework reserves space to pluggable classes.
SP knows of all registered (plugged in) classes, they are stored in a dictionary, associating a class to its plugin implementation. SV has a slot (a gtk.Box) where you can add elements. At any time, at most only one element in the slot is visible.
A plugin defines one or more plugin classes. A plugin class plays the role of a partial presenter (pP - plugin presenter) as it implement the callbacks needed by the associated partial view fitting in the slot (pV - plugin view), and the MVP pattern is completed by the parent presenter (SP), again acting as model. To summarize and complete:
- SP acts as model,
- the pV partial view is defined in a glade file.
- the callbacks implemented by pP are referenced by the glade file.
- a context menu for the SP row,
- a children property.
when you register a plugin class, the SP:
- adds the pV in the slot and makes it non-visible.
- adds an instance of pP in the registered plugin classes.
- tells the pP that the SP is the model.
- connects all callbacks from pV to pP.
when an element in pV triggers an action in pP, the pP can forward the action to SP and can request SP that it updates the model and refreshes the view.
When the user selects a row in SP, SP hides everything in the pluggable slot and shows only the single pV relative to the type of the selected row, and asks the pP to refresh the pV with whatever is relative to the selected row.
Apart from setting the visibility of the various pV, nothing needs be disabled nor removed: an invisible pV cannot trigger events!
bug solving workflow
normal development workflow
- while using the software, you notice a problem, or you get an idea of something that could be better, you think about it good enough in order to have a very clear idea of what it really is, that you noticed. you open an issue and describe the problem. someone might react with hints.
- you open the issues site and choose one you want to tackle.
- assign the issue to yourself, this way you are informing the world that you have the intention to work at it. someone might react with hints.
- optionally fork the repository in your account and preferably create a branch, clearly associated to the issue.
- write unit tests and commit them to your branch (please do not push
failing unit tests to github, run
nosetestslocally first). - write more unit tests (ideally, the tests form the complete description of the feature you are adding or correcting).
- make sure the feature you are adding or correcting is really completely described by the unit tests you wrote.
- make sure your unit tests are atomic, that is, that you test variations on changes along one single variable. do not give complex input to unit tests or tests that do not fit on one screen (25 lines of code).
- write the code that makes your tests succeed.
- update the i18n files (run
./scripts/i18n.sh). - whenever possible, translate the new strings you put in code or glade files.
- when you change strings, please make sure that old translations get re-used.
- commit your changes.
- push to github.
- open a pull request.
publishing to production
please use the publish.sh script, in the scritps directory. This
one takes care of every single step, and produces recognizable commit
comments, it publishes the release on pypi, and in perspective it will
contain all steps for producing a deb file, and a windows executable.
you can also do this by hand:
- open the pull request page using as base a production line
ghini-x.y, compared toghini-x.y-dev. - make sure a
bumpcommit is included in the differences. - it should be possible to automatically merge the branches.
- create the new pull request, call it as “publish to the production line”.
- you possibly need wait for travis-ci to perform the checks.
- merge the changes.
don’t forget to tell the world about the new release: on facebook, the google group, in any relevant linkedin group, and on our web page.
your own fork
If you want to keep your own fork of the project, keep in mind this is full force work in progress, so staying up to date will require some effort from your side.
The best way to keep your own fork is to focus on some specific issue, work relatively quickly, often open pull requests for your work, make sure that you get it accepted. Just follow Ghini’s coding style, write unit tests, concise and abundant, and there should be no problem in having your work included in Ghini’s upstream.
If your fork got out of sync with Ghini’s upstream: read, understand, follow the github guides configuring a remote for a fork and syncing a fork.
closing step
- review this workflow. consider this as a guideline, to yourself and to your colleagues. please help make it better and matching the practice.
distributing for windows
For building a Windows installer or executable you will need an installation of Windows. The methods described here has been used successfully on Windows 7, 8 and 10. Windows Vista should also work but has not been tested.
In the remainder of this section we assume you’re using a Windows workstation. We also assume assume you do not use it as your software development platform. All steps described here are very similar to the steps for a normal Windows installation.
py2exe will not work with eggs
Building a Windows executable with py2exe requires packages not be installed as eggs. There are several methods to accomplish this, including:
Using pip to install. The easiest method is to install into a virtual environment that doesn’t currently have any modules installed as eggs using
pip install .as described below. If you do wish to install over the top of an install with eggs (e.g. the environment created bydevinstall.bat) you can trypip install -I .but your mileage may vary.By adding:
[easy_install]
zip_ok = False
to setup.cfg (or similarly
zip_safe = Falsetosetuptools.setup()insetup.py) you can usepython setup.py installbut you will need to download and install Microsoft Visual C++ Compiler for Python 2.7 to get any of the C extensions and will need a fresh virtual environment with no dependent packages installed as eggs.
Download and install git, Python 2.7 and PyGTK as outlined in the generic installation instructions.
Additionally, download and install NSIS v3.
A reboot is recommended.
we have a script that automates the remaining steps
A batch file is available that can complete the last few steps. To use it use this command:
scripts\build_win.bat
build_win.bataccepts 2 arguments:/ewill produce an executable only, skipping the extra step of building an installer, and will copywin_gtk.batinto place.- A path to the location for the virtual environment to use. (defaults
to
"%HOMEDRIVE%%HOMEPATH%"\.virtualenvs\ghi2exe)
e.g. to produce an executable only and use a virtual environment in a folder beside where you have ghini.desktop you could execute
scripts\build_win.bat /e ..\ghi2exeClone ghini.desktop to wherever you want to keep it (replace
<path-to-keep-ghini>with the path of your choice, e.g.Local\github\Ghini\) and checkout a production branch (ghini-3.1is recommended as used in the example). To do this, open a command prompt and type these commands:cd <path-to-keep-ghini> git clone https://github.com/Ghini/ghini.desktop.git cd ghini.desktop git checkout ghini-3.1
Install virtualenv, create a virtual environment and activate it. With only Python 2.7 on your system (where
<path-to-venv>is the path to where you wish to keep the virtual environment) use:pip install virtualenv virtualenv --system-site-packages <path-to-venv> call <path-to-venv>\Scripts\activate.bat
On systems where Python 3 is also installed you may need to either call pip and virtualenv with absolute paths e.g.
C:\Python27\Scripts\pipor use the Python launcher e.g.py -2.7 -m pip(runpython --versionfirst to check. If you get anything other than version 2.7 you’ll need to use one of these methods.)Install dependencies and ghini.desktop into the virtual environment:
pip install psycopg2 Pygments py2exe_py2
pip install .
Build the executable:
python setup.py py2exe
The
distfolder will now contain a full working copy of the software in a frozen, self contained state, that can be transferred however you like and will work in place. (e.g. placed on a USB flash drive for demonstration purposes or copied manually toC:\Program Fileswith a shortcut created on the desktop). To start ghini.desktop double clickghini.exein explorer (or create a shortcut to it). If you have issues with the UI not displaying correctly you need to run the scriptwin_gtk.batfrom thedistfolder to set up paths to the GTK components correctly. (Runningbuild_win /ewill place this script in the dist folder for you or you can copy it from thescriptsfolder yourself.) You will only need to run this once each time the location of the folder changes. Thereafterghini.exewill run as expected.Build the installer:
python setup.py nsis
This should leave a file named
ghini.desktop-<version>-setup.exein thescriptsfolder. This is your Windows installer.
about the installer
Capable of single user or global installs.
At this point in time ghini.desktop installed this way will not check or or notify you of any updated version. You will need to check yourself.
Capable of downloading and installing optional extra components:
- Apache FOP - If you want to use xslt report templates install FOP. FOP requires Java Runtime. If you do not currently have it installed the installer will let you know and offer to open the Oracle web site for you to download and install it from.
- MS Visual C runtime - You most likely don’t need this but if you have any trouble getting ghini.desktop to run try installing the MS Visual C runtime (e.g. rerun the installer and select this component only).
Can be run silently from the commandline (e.g. for remote deployment) with the following arguments:
/Sfor silent;/AllUser(when run as administrator) or/CurrentUser/C=[gFC]to specify components where:g= Deselect the main ghini.desktop component (useful for adding optional component after an initial install)F= select Apache FOPC= select MS Visual C runtime