Установка
Ghini.desktop - це крос-платформна програма, яка працюватиме на Unix-машинах, таких як GNU/Linux і MacOSX, а також у Windows.
одним рядком для поспішних користувачів.
Користувачі Linux просто завантажують і запускають інсталяційний скрипт. Ви можете ознайомитися з документацією пізніше.
Windows users in a real hurry don’t the instructions and use a recent Windows installer. You do not miss any functional feature, but you have less chances to contribute to development.
Mac users are never in a hurry, are they?
Ghini підтримується дуже небагатьма людьми, які зосереджують свою увагу на підвищенні його функціональних частин, ніж на написанні фантастичних інсталяторів. Замість декількох інсталяторів, ми пропонуємо єдину процедуру встановлення крос-платформ. Це має декілька великих переваг, які ви оцінити, як ми почнемо.
Встановлення засноване на запуску сценарію.
- Сценарій GNU/Linux дбає про все, від dependecies до інсталяції для користувачів у групі
ghini. - Сценарій Windows потребує, щоб ви спочатку встановите пару речей.
- У MacOSX ми використовуємо той самий сценарій, що і на GNU/Linux. Оскільки OSX не має менеджера пакетів за замовчуванням, ми встановлюємо його, і використовуємо, перш ніж запускати скрипт.
Дотримуючись нашої процедури встановлення, по закінчені Ghini працює в віртуальному середовищі Python, всі Python залежності встановлено локально, не конфліктуючи з будь-якою іншою програмою Python, яку ви можете мати у вашій системі.
Залежність, яка не відповідає віртуальному середовищу Python, полягає в наступному: Python, virtualenv, GTK + і PyGTK. Їх установка залежить від платформи.
Якщо пізніше ви вирішите видалити Ghini, ви просто видалите віртуальне середовище, яке є каталогом, з усім його вмістом.
Встановлення на GNU/Linux
Відкрийте вікно терміналу оболонки та виконайте наведені нижче інструкції.
Завантажте devinstall.sh скрипт:
Invoke the script from a terminal window, starting at the directory where you downloaded it, like this:
bash ./devinstall.sh
The script will produce quite some output, which you can safely ignore.
глобальна установка
When almost ready, the installation script will ask you for your password. This lets it create a
ghiniuser group, initialise it to just yourself, make the just createdghiniscript available to the wholeghiniuser group.If feeling paranoid, you can safely not give your password and interrupt the script there.
Possibly the main advantage of a global installation is being able to find Ghini in the application menus of your graphic environment.
You can now start ghini by invoking the
ghiniscript:ghiniYou use the same
ghiniscript to update ghini to the latest released production patch:~/bin/ghini -u
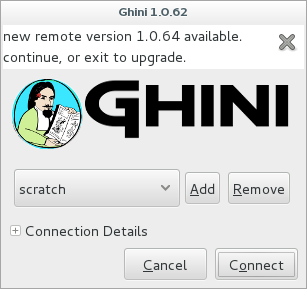
This is what you would do when ghini shows you something like this:
Users of the global installation will also type
ghinito invoke the program, but they will get to a different script, located in/usr/local/bin. This globally availableghiniscript cannot be used to update a ghini installation.Again the same
ghiniscript lets you install the optional database connectors: option-pis for PostgreSQL, option-mis for MySQL/MariaDB, but you can also install both at the same time:~/bin/ghini -pm
Будьте обережні: може знадобитися вирішувати залежності. Як це зробити, залежить від того, який GNU/Linux ви використовуєте. Перевірте свою документацію про розповсюдження.
You can also use the
ghiniscript to switch to a different production line. At the moment1.0is the stable one, but you can select1.1if you want to help us with its development:~/bin/ghini -s 1.1
примітка новачка
Щоб запустити скрипт, спершу переконайтеся, що ви помітили назву каталогу, до якого ви завантажили скрипт, після чого ви відкриваєте вікно термінала, і в цьому вікні набираєте bash, після чого пробіл і повне ім’я сценарію включаючи ім’я каталогу, і натисніть клавішу Enter.
технічна примітка
You can study the script to see what steps if runs for you.
Коротше кажучи, він встановить залежності, які не можуть бути задоволені в віртуальному середовищі, то він створить віртуальне середовище з ім’ям
ghide, використовуйте git для завантаження джерел до каталогу з назвою~/Local/github/Ghini/ghini.desktop, і підключіть git до гілкиghini-1.0(це ви можете розглянути виробничу лінію), він створює ghini, завантажує всі залишки залежностей у віртуальне середовище і, нарешті, створює сценарій запускуghini.If you have
sudopermissions, it will be placed in/usr/local/bin, otherwise in your~/binfolder.
Далі…
Установка на MacOSX
Будучи macOS в середовищі unix, більшість речей буде працювати так само, як на GNU/Linux (різновид).
Перш за все, вам потрібно речі, які є невід’ємною частиною unix середовища, але які відсутні в off-the-shelf mac:
- інструменти розробника: xcode. перевірте сторінку Вікіпедії яка версія підтримується на mac.
- менеджер пакетів: homebrew (tigerbrew для старих версій OSX).
Встановлення на старіші MacOS.
Every time we tested, we could only solve all dependencies on the two or three most recent macOS versions. In April 2015 this excluded macOS 10.6 and older. In September 2017 this excluded macOS 10.8 and older. We never had a problem with the lastest macOS.
The problem lies with homebrew and some of the packages we rely on. The message you have to fear looks like this:
Do not report this issue to Homebrew/brew or Homebrew/core!The only solution I can offer is: please update your system.
On the bright side, if at any time in the past you did install ghini.desktop on your older and now unsupported macOS, you will always be able to update ghini.desktop to the latest version.
З встановленим вище, відкрийте вікно термінала і запустіть:
brew doctor
переконайтеся, що ви розумієте виявлені проблеми, і виправте їх. pygtk знадобиться xquartz і brew не дозволить залежність автоматично. або встановіть xquartz, використовуючи brew або якщо ви вважаєте за краще:
brew install Caskroom/cask/xquartz
тоді встановіть решту залежностей:
brew install git
brew install pygtk  # takes time and installs all dependencies
дотримуватися всіх інструкцій про те, як активувати то, що ви встановили.
In particular, make sure you read and understand all reports starting with
If you need to have this software.
You will need at least the following four lines in your ~/.bash_profile:
export LC_ALL=en_US.UTF-8
export LANG=en_US.UTF-8
export PATH="/usr/local/opt/gettext/bin:$PATH"
export PATH="/usr/local/opt/python/libexec/bin:$PATH"
Activate the profile by sourcing it:
. ~/.bash_profile
Перш ніж ми можемо запустити devinstall.sh як на GNU / Linux, нам все ще потрібно встановити пару пакетів python, глобально. Зробити це:
sudo -H pip install virtualenv lxml
Інше - так само, як на звичайній машині Unix. Прочитайте наведені вище інструкції GNU/Linux, дотримуйтесь їх, насолоджуйтеся.
As an optional aesthetical step, consider packaging your ~/bin/ghini
script in a platypus
application bundle. The images directory contains a 128×128 icon.
Далі…
Установка на Windows
Нижче описані кроки допоможуть вам встановити Git, Gtk, Python та консолі бази даних Python. При правильному настроюванні цього середовища процедура встановлення Ghini працює як на GNU/Linux. Завершальні кроки знов є специфічними для Windows.
Примітка
Ghini був протестований і, як відомо, працює на W-XP, W-7 до W-10. Хоча це має працювати чудово на інших версіях Windows, він не був ретельно протестований.
Кроки по установці на Windows:
завантажити і встановити
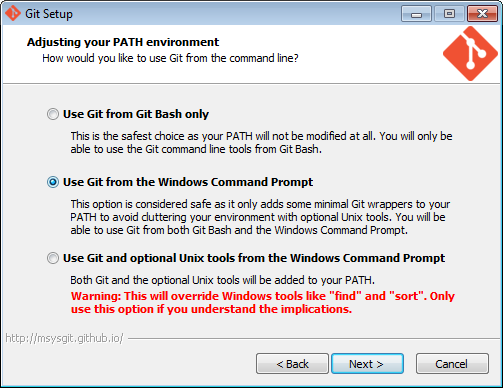
git(поставляється з unix-likeshі включаєvi). Візьміть його з Git завантаження.всі опції за замовчуванням в порядку, за винятком git повинен бути виконуваним з командного рядка:
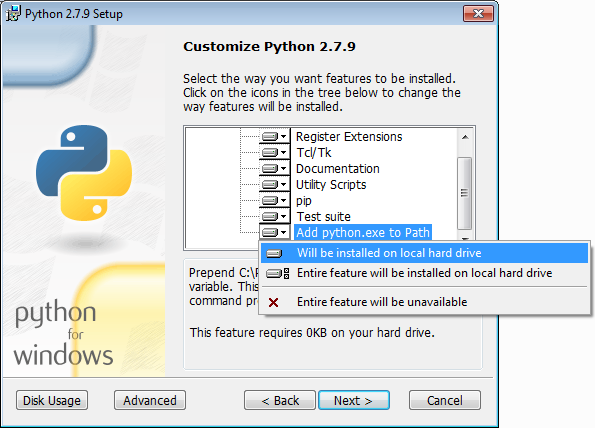
download and install Python 2.x (32bit). Grab it from the Python official site.
Під час встановлення Python вставте Python в PATH:
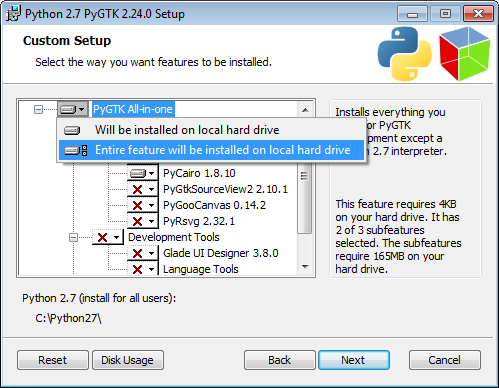
завантажити
pygtkз офіційного джерела. (для цього потрібно 32-бітний python). Переконайтеся що завантажте версію «все в одній».Зробіть повну установку, вибравши все:
(Possibly necessary, maybe superfluous) install lxml, you can grab this from the pypi archives
Пам’ятайте, вам потрібна 32-бітова версія для Python 2.7.
(за бажанням), завантажте та встановіть конектор бази даних, відмінний від
sqlite3.If you plan using PostgreSQL, the best Windows binary library for Python is psycopg and is Made in Italy.
ПЕРЕЗАВАНТАЖЕННЯ
Гей, це Windows, вам необхідно перезавантажити, щоб зміни вступили в силу!
We’re done with the dependecies, now we can download and run the batch file:
Please don’t just follow the above link. Instead: right click, save link as…
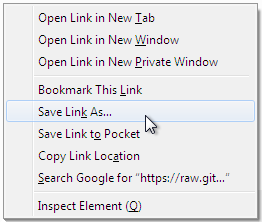
Also make sure you don’t let Windows convert the script to a text document.

Now Open the script to run it. Please note: in the below image, we have saved the file twice, once letting Windows convert it to a text document, and again as a Windows Batch File. Opening the batch file will run the script. Opening the text document will show you the code of the batch file, which isn’t going to lead us anywhere.

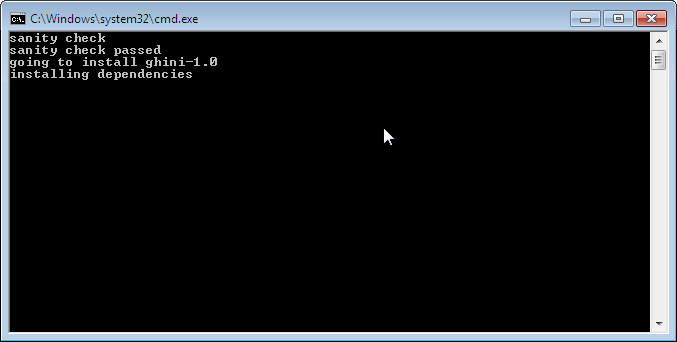
If you installed everything as described here, the first thing you should see when you start the installation script is a window like this, and your computer will be busy during a couple of minutes, showing you what it is doing.
Запуск
devinstall.batперетягне сховищеghini.desktopз github у ваш домашній каталог, підLocal\github\Ghini, перевірте виробничу лініюghini-1.0, створіть віртуальне середовище і встановіть в нього ghini.Ви також можете запустити
devinstall.bat, передаючи його як аргумент числовій частині виробничої лінії, якої ви хочете дотримуватися.Це останній етап інсталяції, який сильно залежить від робочого підключення до Інтернету.
Операція може зайняти декілька хвилин, залежно від швидкості вашого інтернет-з’єднання.
Останній етап установки створює групу Ghini і ярлики в меню Пуск Windows для всіх користувачів. Для цього вам потрібно запустити скрипт із правами адміністратора. Сценарій називається
devinstall-finalize.bat, він прямо в папці HOME, і був створений на попередньому кроці.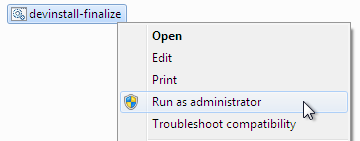
Клацніть правою кнопкою миші на ньому, виберіть запустити як адміністратор, підтвердити, що хочете внести зміни в свій комп’ютер. Ці зміни знаходяться тільки в меню Пуск: створіть групу Ghini, помістіть ярлик Ghini.
download the batch file, it will help you staying up-to-date:
If you are on a recent Ghini installation, each time you start the program, Ghini will check on the development site and alert you of any newer ghini release within your chosen production line.
Any time you want to update your installation, just run the
ghini-update.batscript, it will hardly take one minute.How to save a batch file, and how to run it: check the the quite detailed instructions given for
devinstall.bat.
If you need to generate PDF reports, you can use the XLS based report generator and you will need to download and install Apache FOP. After extracting the FOP archive you will need to include the directory you extracted to in your PATH.
If you choose for PostScript reports, you can use the Mako based report generator and there are no further dependencies.
Далі…
Installing on Android
ghini.desktop is a desktop program, obviously you don’t install it on a handheld
device, but we do offer the option, for your Android phone or tablet, to install ghini.pocket.
ghini.pocket is a small data viewer, it comes handy if you want to have a quick idea
of a plant species, its source, and date it entered the garden, just by scanning a plant label.
Installation is as easy as it can be: just look for it in Google Play, and install it.
Export the data from ghini.desktop to pocket format, copy it to your device, enjoy.